The Castle (Apprentice Mode)
Grand Hallway
A goblin! One would think you could attack it with your Dirk, but that's just what he's expecting you to do. Jair is nothing if not unpredictable, so just Hit the goblin to catch him off guard and knock him out. His prone body will remain on the floor. You can either Use your Dirk or Sword on him to finish him off, or just let him go and knock him out again later when he regains consciousness. Whichever you decide, you may note that the goblins shirt fell off. You can Take the Goblin Armor to add to your growing collection of Outfits, but it doesn't do much in this mode.
Take the four Torches to add to your burgeoning collection. There are two doors in here: one along the wall on the left, and one in the middle of the back wall. We're going to start by exiting the door along the back wall, so Open that one and Go through.
Banquet Hall
Take the Yellowed Scroll, then Open it and Look at it to get some lore. Hmmm…it seems like some of the security systems set up within the castle can be solved by wandering around with a severed wizard's head. As you do. Could this have something to do with the Faded Scroll's text and powering up mirrors?
With that mabacre reading complete, Take the Poker that was placed nearby Now take note of the light pouring through the stained-glass window in the back. Find the spot on the floor onto which the light is concentrating, and Go there.
Floor
The shadows from the stained glass stretch across the stone. At the top of the shadow are two outreached hands which fall upon one of the stones, and taking a Look at that stone reveals that it's loose. Use the Metal Bar or Poker on that stone to pry it loose, and Take the Wizard's Skull you find within. Back out of the this sub room.
Banquet Hall
There are four doors here: the far left door, the left door, the center door, and the right door. The two on the left are locked, so we'll work our way through the other two. Open the Go through the door on the far right.
North Landing 1F
The first room of the North Tower contains two Torches you can Take, but that's all you can do here. Unless you want to burn the two red banners. Go ahead up the stairs.
North Landing 2F
There's a door here that's locked from the other side. Keep this in mind for later, but for now Go ahead up the stairs.
North Landing 3F
There's a single optional Torch here. If you try to Open the door, you'll find that it's locked and someone is laughing behind it. Creepy, but nothing we can do with this yet.
North Landing 4F
There's a single Torch for your collection and, for a wonder, an unlocked door. Open this door and Go inside.
Observatory
There's a Thin Book you can grab, but it doesn't really contain any useful information. Go to the giant telescope in the back to look through it.
Sky
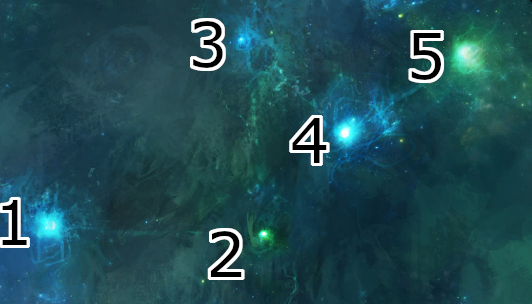
Take note of the shape of the constellation that you see here. I've enclosed an image here to help break this down. The thing you need to do here is Look at each of the big stars in the constellation to have Jair identify them for you. From left to right, roughly:

Click to view in new tab
- Eagle
- All-seeing Eye
- Water
- Tree
- Fire
The astute observer will notice that these are the same things mentioned in the Rune Scroll. Now we know what order these elements need to be placed in. Head back down to the Banquet Hall.
Banquet Hall
Open the door centered between two towers and Go through.
Small Corridor
There are two Torches for those who need to have light to see. Open the door on the left and Go through.
Battlement
Nothing to do here but to Go down the stairs on the left.
Watch Tower
Take the Bow laying on the ground, then Open the Animal Hide Sack. Inside you'll find a Lightweight Key, a Ripped Scroll, and a Watermarked Scroll. Open up the Watermarked Scroll to learn the Fluoris spell. The Ripped Scroll talks about following a path that Ularu'a has tread to get beyond the wall of wisdom, which is a clue for later. You can also Take the Quiver if you need more useless inventory.
Use the Invokan spell on the obelisk to get another convo with Lakmir. You'll learn that you need to somehow get past the Skull Door of Dor Trakken in order to stop whatever it is the Warlock Lord is summoning. That's all we can do here, so make your way back to the Banquet Hall.Banquet Hall
Use the Lightweight Key on the left tower door along the back wall. Now Open the door and Go through to enter the West Tower.
West Landing 1F
There is but a single Torch which can be purloined. Go ahead up the stairs.
West Landing 2F
Ignore this door for now, and Go up the stairs.
West Landing 3F
Take the Torch, then Go up the stairs.
West Landing 4F
Open the door to the right and Go through.
Strong Room
You're greeted here by Malor Kahu, a fearsome top lieutenant in the Warlock Lord's army. After she fills you in on her backstory, she reveals herself to be a werewolf! In Apprentice Difficulty, you have two ways to survive this encounter. You can do things the traditional way (like in the original game) and Use the Arrow you picked up all the way back in the Grotto on the werewolf. Or you can be fancy and Use the Bow with the Arrow, then Use your new Bow and Arrow combo on the werewolf to defeat her.
Once Kahu has been dispatched, time to loot her chamber. Take the Torch. The optional items here are the Blueprints on the wall, as well as the Bread and Kahu's Log Book sitting on the desk. Open the desk to find the Steak, Black Key, Knife, Strange Paper, and Cloth Sack. Open the Cloth Sack to find the Grey Key, an Ancient Gold Coin, and a Gold Coin. Make your way back down to the Banquet Hall.
Banquet Hall
Time to enter the final tower. Use the Black Key on the door on the far left, then Open it and Go through.
South Landing 1F
And optional Torch here for you to Take, then Go up the stairs.
South Landing 2F
Open the door and Go through.
Empty Room
It may seem like there's nothing to do here, but that would be entirely incorrect. Use the Flumoris spell to reveal all of the invisible things in the room. They'll slowly fade away again over time, but if everything vanishes before you get everything you want just cast the Flumoris spell again to start over. There are two Torches to Take, but the important item is the Creasy Scroll sitting on top of the desk. Open and Look at the scroll to learn the Sparrx spell. You can also grab two Cushions from the couch. Go back out onto the Landing.
South Landing 2F
Go up the stairs.
South Landing 3F
Yet another Torch ripe for the taking.Open and Go through the door.
Music Room
Fun things you can do in this room: Use the Harp, Drum, Lute, and Flute on Thyself to play a haunting melody. Does nothing in Apprentice Difficulty, but still fun. Take the Flute. You can also optionally Take the Lute, the Mallet, and the Hat. The Hat can be used to complete the Dread Pumpkin Quest, but the Lute and Mallet are useless. Head back out to the Landing.
South Landing 3F
Go up the stairs
South Landing 4F
Could these be the nettlesome roots mentioned in Kahu's Log Book? She's spent scores of years trying to get past them, what hope could we possibly have? Turns out we have something the mighty commander did not: a Dirk! Use the Dirk on the roots, then Open the door and Go through.
Note: if you felt this was a bit of an anticlimactic puzzle resolution, don't worry, it's just a perk of playing in Apprentice Difficulty.
Lakmir's Abode
Oh, that's where he is. There's a protective field around Lakmir to keep him out of danger while he's astral projecting, so we have no way of interacting with him. What we can do is climb on top of him and Go to the source of the light above him.
Ceiling
Among the collection of roots, one stands out. Take the root that's dead center of the screen to receive the Golden Thorn. Go back down.
Lakmir's Abode
There are two holes along the right wall: one higher up towards the ceiling, and one down by the floor. There's nothing we can do with the top one, so Go through the lower one.
Inner Sanctum
Optionally, you can Take the Ancient Book and the Year 1851 Book on top of the desk if you've got a hankering for some lore, and also the Bottle if you want more inventory. Open the chest sitting on the floor to find the Lion Key, Discolored Scroll, Strange Scroll, and Cuthegar I Book. Open the Strange Scroll and Look at it to learn the Acensur spell. Now backtrack all the way back to the Circle Chamber.
Circle Chamber
Use the Acensur spell on the circle, then Go into the glowing area. You are now a member of the order! To test out your new powers, Go back to the Grate room.
Grate
We can finally do things with the round Runes that are stuck to the walls. Take the Water Rune here that the corpse is pointing at. We'll need to collect a few more of these to complete the game, but there are some extras that serve no purpose. For the purposes of this walkthrough, I'll guide you to the mandatory ones and list the optional ones in the Items section if you really want to track them down. At any rate, Go all the way back to the Entrance.
Entrance
Use the Wizard Skull on the hole on the top of the doorframe. This not only completes the skull pattern, but activates the mirrors, as mentioned in the Yellowed Scroll. Now Go to the Hideaway.
Antechamber
Use the Aggaap spell on the stone hatch on the floor, then Go into the new gap that opens up.
Gears
Take note of the lower left corner, where there's a large gap due to a missing gear. Match the levers to the pattern shown there (up, center, down) by Using them, and then Use a Gear (you should have one you got from the Bucket. If not, either go grab that or Use the Metal Bar or Poker on the Gear you placed by the Grate to pry it loose) on the empty slot. Use the button beside the levers to activate the mechanism. Now return to the Waterfall room.
Waterfall
Solving the Gear Puzzle has stopped the waterfall and revealed a spooky mouth cave. Go into the cave entrance.
Hideaway
There are two Runes here. You need the Eagle Rune on the left, but you can optionally take the Wind Rune as well if you so desire. If you have an affinity for gravel, you can Take the two Stones on the ground. They can be used for Sling ammo, but not much else. Open the corpse to search it and find the New Scroll, which gives a clue to find an out of the way room later on. Make your way back to the Mirrors.
Hideaway
Go to the Mirrors room.
Mirrors
Two of the mirrors on the right are sparkling at the top. Go into the third mirror in from the right to be transported.
Store Room
You can Use your lit Torch on the tarp to burn it if you really want to. Otherwise the only thing to do here is Open up the Yellowed Sack on the floor to get two pieces of Kane (aka sugar), but these are useless in Apprentice Difficulty. Nothing more to do in here except to Open the door to unlock it. Open it proper and Go through.
North Landing 2F
Go upstairs twice to reach the top floor.
North Landing 4F
Use the Grey Key on the door to unlock it. Open and Go through.
Spire
Use the Sparrx spell on the sky to attract the attention of a fierce wyvern. He's got a very fancy necklace, but he won't let you near him. Any aggressive action you take will scare him off, and you'll have to Use the Sparrx spell again. Use the Steak or the Bread on the wyvern, and it will be so distracted by the delicious meal that you can Take the Bladed Sun from around his neck. Go back to the Grand Hallway.
Grand Hallway
Open and Go through the door on the left.
Library
There are two tables in the foreground, each adorned with a single book. The Lotharyth Book on the righthand table doesn't contain much beyond some lore. Apparently Talimar was pretty sketchy from the beginning. The Nothing Book on the lefthand table is likewise pretty useless, to the point of being completely blank. On top of the desk are a Red Candle and a Yellow Candle, but they're not worth your time. Take the Locked Book that's sitting on the desk. Open the desk and you'll find a Purple Liquid Bottle, Blank Parchment, and Cloth-bound Book. You can Use the bottle on Thyself to cure the banshee's curse! The other two items serve no purpose in Apprentice Difficulty.
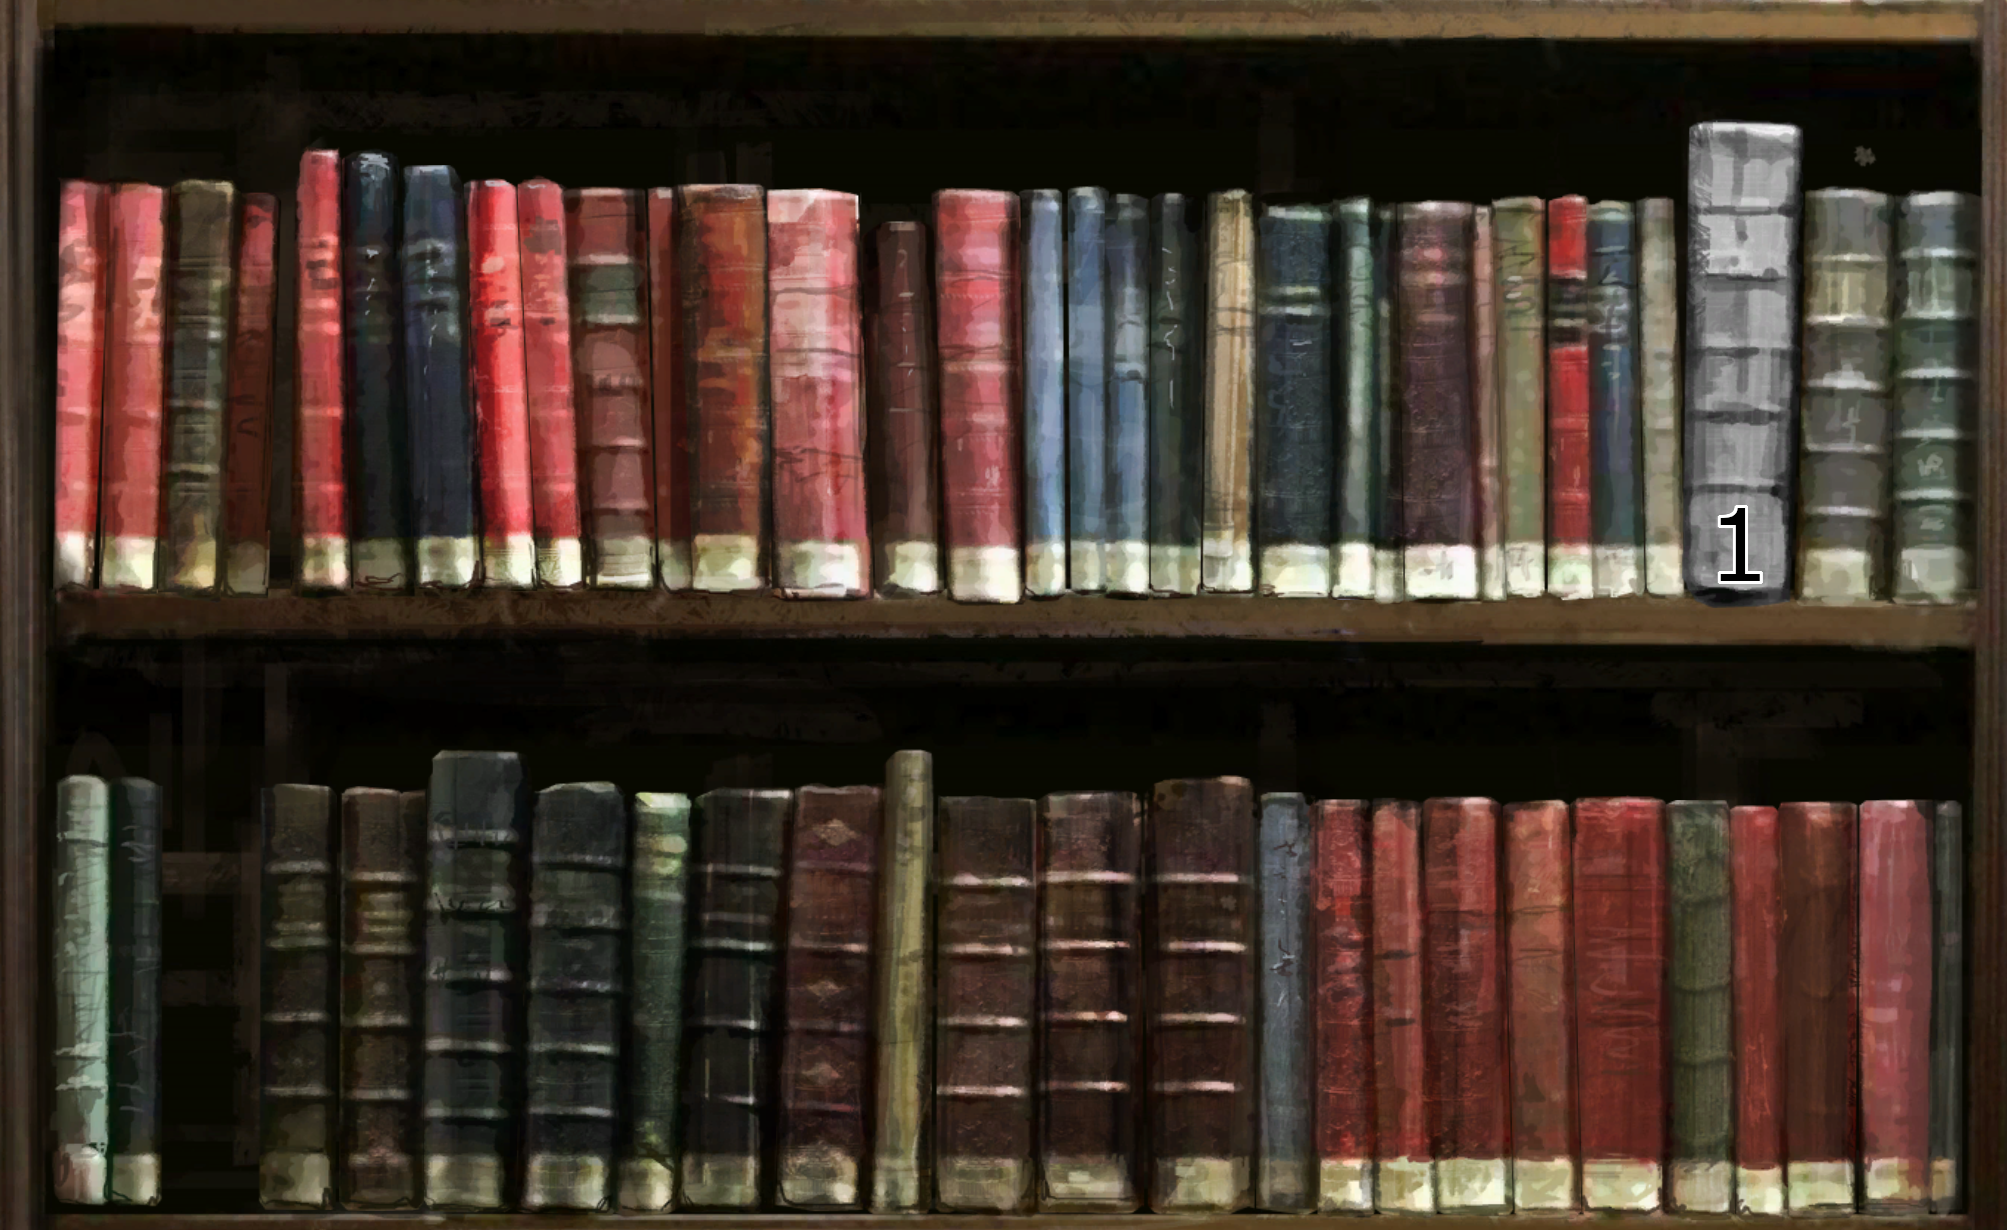
Notice that on the back wall is a set of maps. Not important by themselves, but they make for a handy, if not unfitting, landmark. Go to the bookcase immediately to the right of the maps to zoom in on it.
Bookcase
One could say that this is a veritable wall of wisdom. Which is something we saw in the Ripped Scroll. If you Look at the Locked Book you picked up off the desk, you'll see that the cover just says "Ularu'a." The Ripped Scroll told us to follow the path Ularu'a tread, so we have the main piece of the puzzle already in our hands. Use the Locked Book on the large gap in the top row of books and it will click into place. Now Use the book, and it will trigger a hidden door to open.

Click to view in new tab
Library
Go through the newly opened secret passage.
Study
Take the Eye Rune in the middle of the floor. Now Use one of the logs on the ground on the fire pit in the back of the room to summon the Fire Elemental. Use the Silver Orb in it to capture the fiery being. While you're here, you can also Take the Pumpkin hiding underneath the table on the right. Go out and make your way to the West Landing 2F.
Optional
You can take a quick detour at this point and complete the Dread Pumpkin Quest. Make your way to the North Landing 3F. Equip both the Mask and the Hat, then Speak to the door to gain entry. Go inside to find a room empty except for a mirror with an orange sparkle of power along the top, and a Brown Sack. If you Open the sack you'll find six Stones. Go through the mirror to be teleported to a Pumpkin Patch. Use the Pumpkins on the glowing circles on the ground.
Use your Dirk or Knife on each of the Pumpkins, to carve them into Jack-o-lanterns. Then Use your lit Torch on them to light them. The Dread Pumpkin shall thus be summoned, and you have freed his spirit. That's it, unless you want to Take the Tattered Sheet from one of the graves. Note that if you carve the Jack-o-lanterns before placing them in the circles, it will fail to summon the Dread Pumpkin. Now continue the main quest and Go to the West Landing 2F.
West Landing 2F
Open and Go through the door.
Darkness
Use the Silver Orb on the darkness to unleash the Fire Elemental to do battle with the Darkness Elemental that was controlling the visibility in the room. Use the Hammer on the cracked section of wall near the man on the horse to reveal a hidden horn. Take the Platinum Horn. Now Take the Tree Rune embedded into the tree painting. Now Go back to the Store Room.
Store Room
Go through the mirror.
Mirrors
Go through the second mirror in from the far right.
Inner Keep
Take the Fire Rune on the wall, then Open the Tattered Sack on the ground to find a Skull, the Broken Flute, the Old Scroll and the Sturdy Scroll. The Sturdy Scroll will give you some hints for how to go about crossing that rickety bridge we saw all the way back in the Footbridges room. The Old Scroll, when Opened and Looked at, will teach you the Crysalys spell. Go through the door.
Summit
Go up the stairs.
Keep Tower
There's a large tornado here. From the Sturdy Scroll, we know that the Air Elemental will need to be soothed before it can be harnessed. We can infer from the Broken Flute we found in the same sack that this was likely the method used for said soothing. We have a Flute from the Music Room, but using it does not yield any results. If you Look at the Broken Flute, you'll notice that it has three holes carved into it. Your flute, however, only has a single hole. Use the Knife on the Flute twice to carve the extra holes, then Use the Flute on Thyself to play a soothing melody. The tornado will calm down and be revealed as the Air Elemental. Use the Silver Orb on it to capture it. Now Go all the way back to the Footbridges.
Footbridges
Use the Silver Orb on Thyself to have the Air Elemental lift you a bit. Now Go to the door at the end of the rickety bridge.
Small Chamber
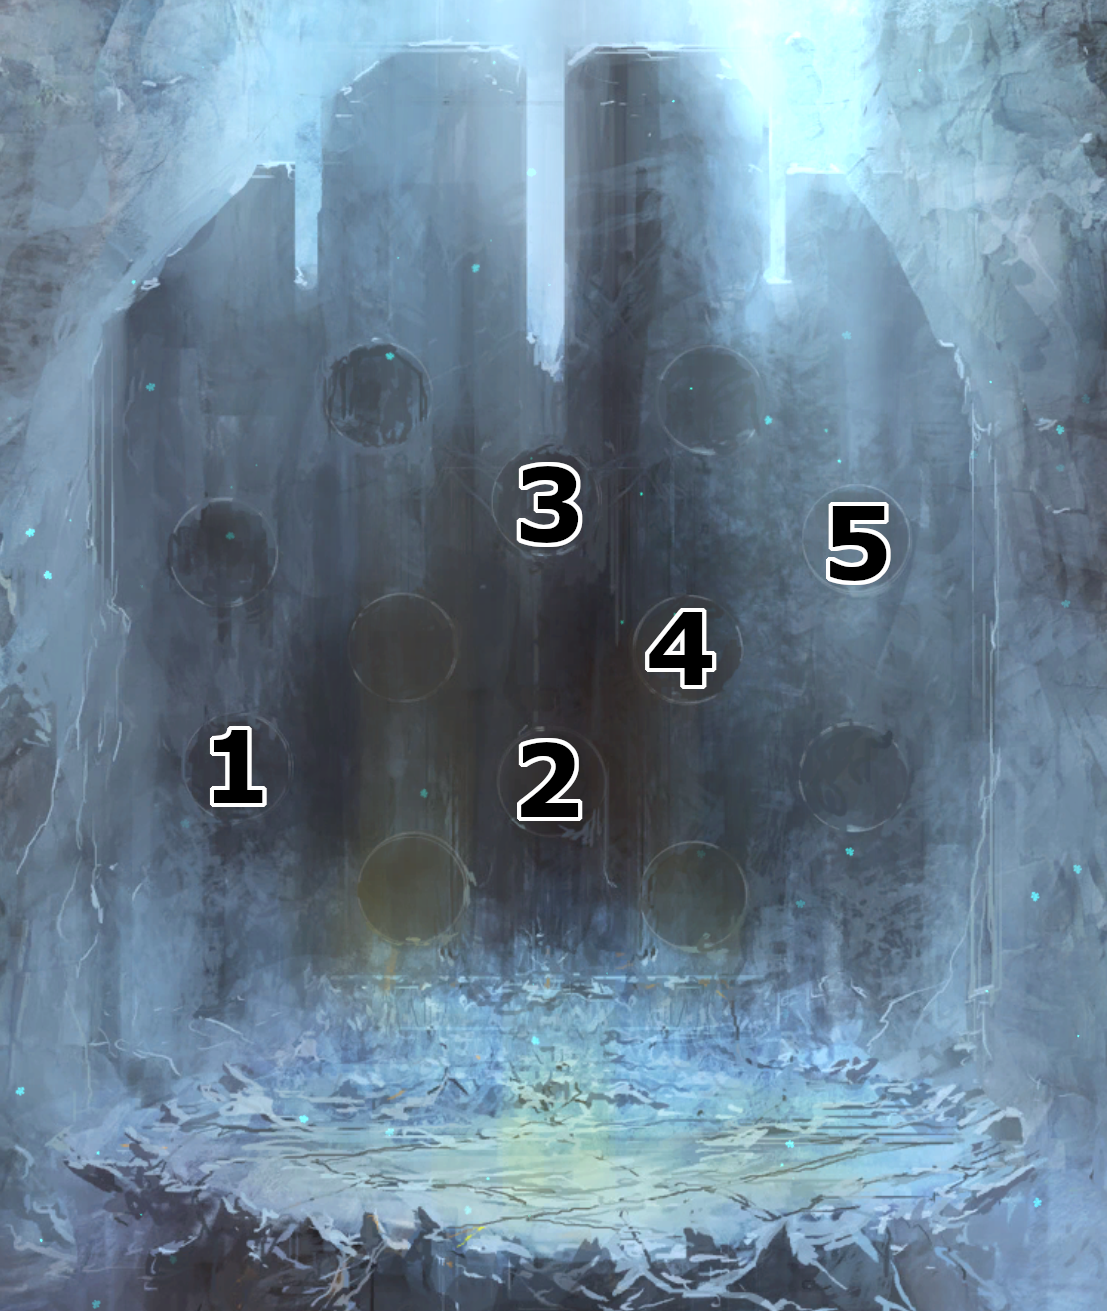
You're greeted by a wall full of suspiciously Rune-shaped slots. Refer back to the star chart earlier for a visual representation of how to place the various Runes into these. There's only one possible way that the constellation fits into the wall, but I'll talk you through it just in case. For the purposes of this list, Row 1 is the top row, and Row 5 is the bottom row.

Click to view in new tab
- Use the Eagle Rune in the far left slot in Row 4
- Use the Eye Rune in the middle slot in Row 4
- Use the Water Rune in the middle slot in Row 2
- Use the Tree Rune in the right slot in Row 3
- Use the Fire Rune in the far right slot in Row 2
With all five Runes in place, Use the chain on the far left and the Stave will magically appear before you. Take it, then make your way back into the castle and into the Small Corridor.
Small Corridor
Use the Lion Key on the door on the right. Open it and Go through.
Ornate Chamber
You can Take the New Book resting against the throne if you want to, but it just contains some lore. Take note of the mural along the back wall, this shows the solution for a puzzle down the line. There's a statue on the left behind a crevice with a pillar leaning on it. Use your Hammer on the statue twice to break it, which has the added effect of dropping the pillar that you can now use as a ramp. Go down the pillar to the area below.
