
Disciples Tower
Disciples Tower B1

You emerge from the sewers into a small room. There's nothing of interest in here, so turn around and open up the door to step out into the hallway.
Turn to the left and walk down the hallway for a short bit. Halfway through, there will be two doors on opposite sides. There's stuff we need behind both, but first enter the one to the right.
If you turn right and head to the opposite wall, you'll spot a child's slipper sitting on a small table. You can try and pick it up, but a mysterious force seems to be holding it in place. Speaking of mysterious forces, you can examine the rocking horse for a quick spook. That optional stuff out of the way, head over to the bookshelves and get a closer look at the one on the far right. On one of the shelves is a small statue. Pick this up to obtain the Fairy Sculpture. That's all we can do here for now, so exit the room and then open the door across the hall.
Turn to the right and head toward the shelves along the far wall. On the floor between those and the giant logs is a length of Frayed Rope. Pick this up and then exit the room.
Once back in the hallway, turn left and follow the hallway around the corner when it takes a left turn. There will be a door on the right at the corner, but it's locked so we can safely ignore this for now. Continue down the hallway and head up the stairs at the end.
Disciples Tower 1F

Enter the door in front of you to reach the foyer of the tower. Off to the right (after Del has finished looking around) there will be a large set of double doors which can be used to exit the tower. Well, they would be were they not locked. The doors may be useless to us now, but the L-shaped counter to the left of them is not. Sitting on top is an Elf Statue that you will need to pick up. Once you have the statue in hand, turn around. There's a small door with a dragon emblazoned on it across the room, but this is currently locked. Keep that in mind for later. For now, head through the large open doorway to the left of the dragon door and approach the staircase. The spirit of Lakmir will greet you and chat for a bit. He's a tad cryptic, but he seems to know who you are and invites you to meet him again in Lakmir's Tower. Unless you want to just give up, in which case he'll be lonely. Once he's done speaking, move forward and head up the stairs.
Disciples Tower 2F
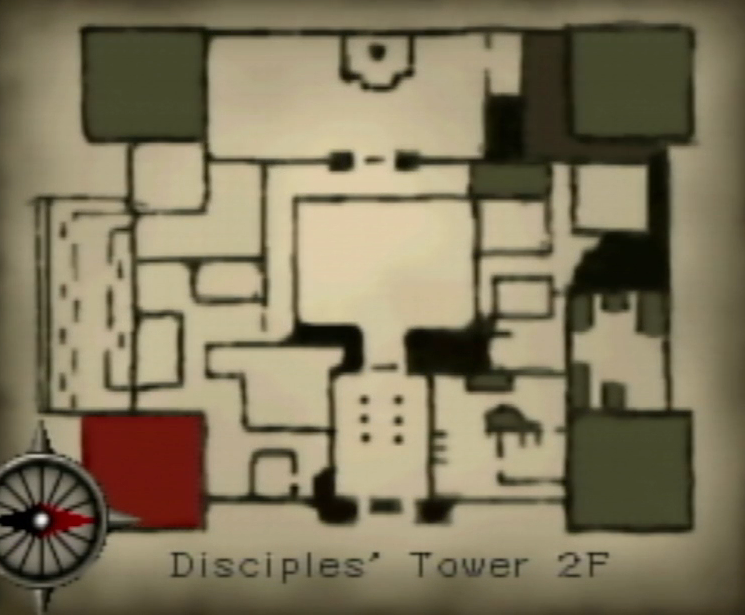
You find yourself in a long classroom. To the left you can spot a step ladder in front of a window. We can't do much with that for now, but keep it in mind for later. If you want to, you can pick up the various books scattered about the tables, four tomes in total. Two of them are blank, but you can still pick them up now to have on hand for when we can eventually read them. The Final Battle has a vague hint of the final puzzle, and Of Riding Dragons has some important lore. When you're done, enter any of the three doors along the wall opposite of where you entered.
In this second classroom, there are several more tables and three more books. Both the Laws of Magic and Memorandum contain hints for much later on, which the Artifacts of Power book alludes to a way out of this tower. Once you have all of your new lore in hand (if you want any of it), exit up the stairs across from where you entered from.
Disciples Tower 3F

Here in the entryway, we are confronted with three doors. To start things off, enter the door on the right. This smaller classroom contains a couple items of varying degrees of usefulness. From the door, turn to the right and head over to the far table to pick up a vial of Liquid Sunset. It might look delicious, but you should avoid drinking it for now. If you want some extra lore, you can walk over to the other side of the table and look on the floor to find a Report. On the other side of the room, there's an Apeman Sculpture on the floor tucked under the corner of the table. You don't really need this, but pocket space is overrated. Once you have everything you need/want, exit back out into the entryway.
Turn to the right and enter the door across from the stairs. As soon as you enter this lecture hall, one of the tables mysteriously flips itself over. Spooky, but there's nothing dangerous in here. Turn right and head toward the wall, and pick up the Ancient Coin you find in the corner. Turn left once you have the coin so that you're facing two tables. Walk past the first one, then crouch down to spot a piece of parchment tucked underneath the second. Pick this up to get some Lecture Notes, which give you the solution to a puzzle later on. You can also snag The Book of Orders and a Primitive Man Statue from the tables if you want to. The former gives you the solution to an upcoming puzzle, and the latter adds clutter to your pocket. There's also a copy of The Speeches of Lord Jair on the ground by the upturned table if you want some extra lore. Once you have everything, head back out into the entryway.
Turn right and enter the final door on this floor. Head over to the set of bookshelves to the left. There's a gap along the lower part of one of them containing a human statue and two empty slots. If you've been collecting everything, you'll have four statues. One might think, given what two of the statues are, that we need to follow the evolutionary path of humans. If you thought that, you would be correct. However, things work a bit differently in Kal Torlin where magic exists. Instead of following evolution as we know it, we need to follow the creationist myth outlined in The Book of Orders. Use the Fairy Sculpture first, followed by the Elf Statue. Once they're in place the bookshelf will slide to the side and reveal a hidden set of stairs. Head on up to the next floor.
Disciples Tower 4F

You arrive in a long hallway, with two doors along the right-hand wall. Enter the first door to find a dormitory. There's a Blank Book you can take on one of the end tables. On the bookshelves along the back wall is a Pixie Flute that you will need to pick up. That's everything in this room, so head back out into the hallway.
Continue down the hall and enter the other door. In this dormitory, we've got several pieces of lore scattered about the beds and end tables. The Personal Note and Personal Memo are just superfluous lore, but the Student's Diary and The House of Dreslin contain clues for some future puzzles. That brings us to everything we need on this floor, so make your way back down to the second floor.
Disciples Tower 2F
Once you reach the second floor, exit into the next room. Across from you will be the stairs leading down to the first floor, but we're going to ignore that for now. Turn to the right and head toward the window, then climb up the step ladder. At the top, use the Rope and Del will tie it to the lattice and drop the end down to the ground outside. We might be short, but we're still much too big to fit through the window. Use the Pixie Flute and Del will shrink down to the size of a pixie. Examine the rope and agree to climb down to finally escape this tower of learning.